
GM, COT❣️ Yuzunoko here.
Have you ever taken cosplay photos outside and ended up with a face that's too dark, or shadows that are way too heavy?
Nikon's photography course breaks light down by direction, angle and strength. The official pages from Canon, Sony and Fujifilm give similar advice about light when you're photographing people.
Using the camera makers' official explanations and the sunrise and sunset times published by the National Astronomical Observatory of Japan (the country's national astronomy research institute), I've put together how to choose your light outdoors.
Think about light by "direction" and "angle"
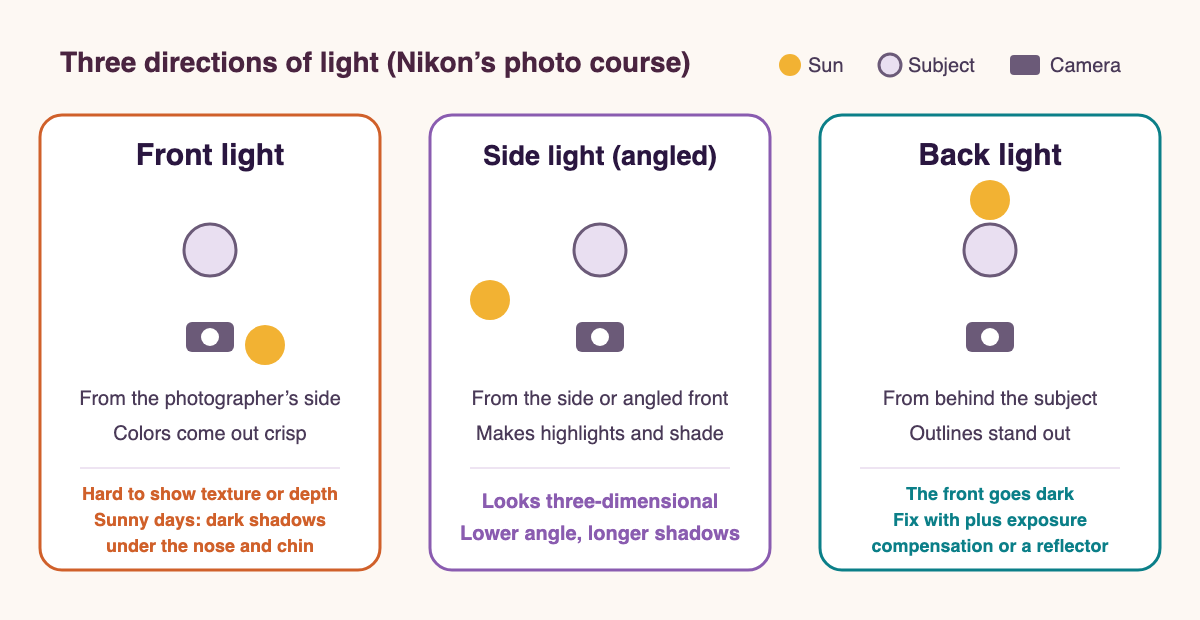
Nikon's "Shooting Techniques Using Light" splits the direction of light into three.
- Front light: light that hits the subject from the photographer's side. Colors come out crisp, but texture and depth are hard to show
- Side light (angled light): light that hits the subject from the side or at an angle from the front. You get bright areas and shade, so things look three-dimensional
- Backlight: light that hits the subject from behind. The front goes dark, but the outline stands out
Here are the three directions as a diagram, showing where the sun, the subject and the camera are.
There are two kinds of angle, too: top light, which comes from straight above, and angled light, which comes from the side or at a slant.
With top light, light falls on everything and shadows get short, so apparently flat subjects don't show much texture or depth. Angled light brings out a three-dimensional look, and the course explains that the lower the angle, the longer the shadows.
The same course describes light on a sunny day as strong, hard light, and light on a cloudy day or through a lace curtain as weak, soft light.
Which light you pick probably depends on how you want to show off the texture and detail of your costume's fabric and trims.
Strong midday light tends to put shadows on faces
As a caution for photographing people, Nikon's course says that front light on a sunny day is strong, hard light that makes dark shadows under the nose and chin.
Picking soft light, like backlight, a cloudy day, or light through a lace curtain, makes the shadows lighter.
Sony's camera guide also explains that shooting in front light can put shadows on the face, or make the person squint so their expression looks harsh.
Fujifilm's shooting guide says front light with the sun directly in front of the subject is hardly ever used for portraits, because the sun gets in the model's eyes and they tend to squint. It suggests having the light hit from somewhere between about 45 degrees in front and 45 degrees behind.
Canon's FAQ likewise explains that in its example shot with the sun hitting from the front, the skin tones came out nicely, but the person squinted from the glare.
It'd be such a shame for your perfect pose face to fall apart because of the glare (especially after you've gotten your wig and makeup just right).
With shade and backlight, make up for the darkness
As a way out when the sun is strong, both of Sony's pages suggest changing where you are. The camera guide says to step into the shade of a tree, and the course for α owners says to move under a tree or the eaves of a building.
The same course also says that if you're not sure, give backlight or partial backlight a try.
Shoot into backlight, though, and now the face goes dark.
Sony's camera guide introduces using exposure compensation to brighten the face, and says the background turns a bit white but the mood gets gentler.
Nikon's course also suggests plus exposure compensation, a reflector, or daylight fill flash for backlight.
Canon's FAQ puts two examples side by side: a face darkened by backlight brightened with a flash, and one brightened with a reflector. Its explanation is that the reflector gives a more natural brightness, and because the reflected light shows up in the eyes, the eyes look sparkly.
What a reflector does, and using one at events
According to Canon's photo glossary, a reflector is a board that bounces light, and it's used to keep the parts left in shadow by backlight from going solid black. The common kind has a silver side (a silver reflector) and a white side (a white reflector).
It says that on cloudy days people often use the silver side to throw plenty of light, while on sunny days the silver side reflects too strongly, so they often use the white side.
Canon's FAQ says a white notebook or towel can stand in for one (apparently how well it works depends on how much light it reflects). It also says you can have the person you're photographing hold it.
At event venues, though, there are limits on when you can use one. The page from the Comic Market Preparatory Committee, which runs Comiket (Japan's biggest doujinshi market), says that reflectors, tripods, strobe stands and the like may not be usable when it's crowded.
The participation rules of the Ikebukuro Halloween Cosplay Fest (a cosplay event in Ikebukuro, Tokyo) say reflectors are fine as long as they're handheld or camera-mounted and don't take up much space.
Check the venue's rules before you bring one.
In October in Tokyo, sunset gets about 40 minutes earlier over the month
When you're choosing a time of day, sunrise and sunset times are a good guide.
According to the table from the National Astronomical Observatory of Japan's Ephemeris Computation Office, on October 1, 2026 in Tokyo, sunrise is at 5:35 and sunset is at 17:26
On October 31, sunrise is at 6:01 and sunset is at 16:47, so over the month, sunset comes 39 minutes earlier.
The sun is at its highest (solar transit) at 11:31 on October 1 and 11:25 on October 31. At those moments, the sun's height above the horizon (its transit altitude) is 51.2 degrees on October 1 and 40.3 degrees on October 31.
In the table, sunrise and sunset are the times when the upper edge of the sun lines up with the horizon. The times change outside Tokyo, so check the table for the place where you'll be shooting.
Sony's course for α owners explains that evening light is soft and yellowish, giving a warm mood, while midday light is strong and casts deep shadows. Fujifilm's guide recommends scouting your location at the same time of day you plan to shoot, and checking where the sun will be.
If you're after a cool shot in evening light, working backward from sunset seems like the way to go (the sun really does set fast in autumn❣️)
About this article
I put this article together from the official photography courses and support pages of Nikon, Canon, Sony and Fujifilm, and the sunrise and sunset table from the National Astronomical Observatory of Japan's Ephemeris Computation Office. The makers' explanations are for photographing people in general, not written specifically for cosplay.
Before you head out to shoot, check the weather for the day, the sunset time where you'll be shooting, and each venue's rules on equipment.
Quotes from Japanese sources are our own translations.
Translated from the Japanese original.
See you next time on COT❣️